
Apple Pay
Apple Pay is supported across all three integration types: Hosted Page, Hosted Elements, and Direct API. This guide covers
- General information: how Apple Pay works, certificates and their ownership, decryption and quick integration types comparison.
- Certificate ownership options with pros and cons.
- Hosted Page & Hosted Elements: where we handle the Apple Pay session and tokenization.
- Direct API: where the merchant handles tokenization directly.
General information & certificates
Apple Pay is an e-wallet payment method: instead of collecting raw card data, the shopper authorizes the payment on their device through Apple Pay Wallet, and Apple returns a payload that is encrypted, cryptographically connected to an Apple Pay Merchant Identity Certificate. Only the party with the matching private key can read the card data inside that payload.
For Apple Pay to work, two things need to exist and be linked together:
- A Merchant Identity / Merchant Processing Certificate and its private key: used by Apple to encrypt the payload on the device, and by the party that holds the matching private key to decrypt it later, right before authorization.
- Domain verification: Apple needs to verify that the domain running the Apple Pay session is authorized for the Merchant ID in question, via a
.well-known/apple-developer-merchantid-domain-associationfile hosted on that domain.
Merchant Identity Certificate vs. Payment Processing Certificate
These two certificates are often referred to together, but they serve two different purposes in the flow, and it's worth keeping them distinct:
- Merchant Identity Certificate: tied to the Merchant ID, this is what authenticates the party opening the Apple Pay session with Apple's servers (the
validateMerchantcall). Whoever opens the session (us, on Hosted Page/Hosted Elements, or the merchant, on Direct API) needs this certificate available at that step. - Payment Processing Certificate: its public key is what actually encrypts the
paymentDataon the shopper's device. The matching private key is what the decrypting party (typically the PSP) uses to decrypt the payload right before authorization.
In practice, both are generated and managed together as part of the same Merchant ID setup with Apple, and the rest of this guide refers to them jointly as "the certificate." But when troubleshooting or exchanging material with Apple/the PSP, it's this distinction that determines which certificate is needed for which step (session validation vs. decryption).
Certificate Ownership
You can choose who owns and manages this certificate: you as a merchant, the third party, or us.
Option A: Merchant (or a 3rd party) owns the certificate
The merchant (or a 3rd party provider) manages their own Apple Pay Merchant ID directly with Apple:
-
Opens the Apple Developer Account.
Requirement: holding the certificate under Option A requires the merchant (or the 3rd party) to have their own active Apple Developer Account, enrolled for Apple Pay, since the Merchant ID and its certificates can only be created and managed from that account. If the merchant doesn't have, or doesn't want to maintain an Apple Developer Account, Option B is the alternative.
-
Generates a private key and a Certificate Signing Request (CSR).
This step is optional for the merchant to perform themselves: private key generation and the CSR can instead be delegated to and managed by the PSP, if the PSP supports it. In that case, the PSP generates the key pair and the CSR, the merchant only uploads that CSR to Apple under their own Merchant ID (see next step), and the PSP retains the private key needed later for decryption. This keeps certificate ownership with the merchant (it's issued under their Merchant ID) while avoiding the merchant having to generate and safeguard the private key itself.
-
Uploads the CSR to Apple, under their own Merchant ID.
-
Apple issues a Merchant Identity Certificate.
-
The domain association file is hosted on whichever domain actually runs the Apple Pay session, and domain verification is performed from the Apple Developer account that owns the Merchant ID - these are two separate steps that don't necessarily fall to the same party:
- Hosted Page: the session runs on our domain, so we host the domain association file received from the merchant. Verification, however, is still performed by the merchant, from their Apple developer account (since the Merchant ID belongs to them) - they register/verify our domain against their own Merchant ID.
- Direct API / Hosted Elements: the session runs on the merchant's own domain. The merchant hosts the file and verifies the domain themselves, from their own Apple developer account.
-
The Merchant Identity Certificate is exchanged with us and/or the PSP because:
- If we are the ones opening the Apple Pay session (eg. on a Hosted Page), we need the certificate to do so on the merchant's behalf.
- The PSP needs it to decrypt the payload before the authorization, regardless of who opens the session.
Option B: We own the certificate
We hold our own Apple Pay Merchant ID and Merchant Processing Certificate:
- We generate the private key and the CSR through our Apple account.
- Domain association:
- Hosted Page: We host the file on our domain as the Apple Pay session runs there
- Hosted Elements/Direct API: We provide the file to a Merchant and they host it at
/.well-known/apple-developer-merchantid-domain-associationon their own domain.
- We process the domain verification against our Apple Merchant ID.
- We exchange our Merchant Processing Certificate with the PSP, so it can be used for decryption
Option A vs. Option B: pros and cons
Trade-offs between letting the merchant (or a 3rd party) hold the Apple Pay certificate, versus us holding it on their behalf.
Merchant owns the certificate
Pros
- ✓Full control over their own Merchant ID, useful if they run Apple Pay elsewhere too
- ✓Certificate and Merchant ID stay with the merchant if they change PSP or provider later
- ✓Private key / CSR generation can be delegated to the PSP, easing the heaviest step
Cons
- –Requires an active Apple Developer Account enrolled for Apple Pay on their side
- –Higher setup effort: Merchant ID creation, CSR upload, and domain verification are on them
- –Merchant is responsible for renewing the certificate and keeping the account in good standing
- –Slower time to launch, since it depends on the merchant completing their own Apple-side steps
We own the certificate
Pros
- ✓No Apple Developer Account needed on the merchant's side
- ✓Lower setup effort: we handle Merchant ID, CSR, and domain verification
- ✓We handle certificate renewal centrally, reducing the risk of it being overlooked
- ✓Faster time to launch, since most of the setup is already in place on our side
Cons
- –Merchant has no direct relationship with Apple for this Merchant ID; it's tied to our setup
- –Migrating away later means re-doing certificate setup under a new owner
Either option can be combined with any of the three integration types - see the table above.
Decryption
Regardless of which option is used, we do not decrypt or store the Apple Pay payload in clear text. It's stored and forwarded exactly as received to the decrypting party (mostly the PSP). The decrypting party decrypts received data using the private key that matches the certificate (ours or the merchant's), immediately before the authorization request is sent to the acquiring bank.
Integration types at a glance
How responsibility for the checkout page, the Apple Pay session, tokenization and the order call is split across our three integration types.
| Hosted Page | Hosted Elements | Direct API | |
|---|---|---|---|
| Checkout page ownership | Us | Merchant | Merchant |
| Apple Pay session creation | Us | Usvia embedded widget | Merchant |
| Tokenization | Us | Us | Merchant |
| Order call | Us | Merchant | Merchant |
| Certificate ownership | Merchant or us | Merchant or us | Merchant or us |
| Integration effort | Lowest | Medium | Highest |
Certificate ownership (merchant-owned vs. us-owned) can be chosen independently for any of the three integration types - see “General information & certificates” above.
Hosted Page & Hosted Elements
With both Hosted Page and Hosted Elements, Apple Pay JS runs on our side, meaning we always initiate the Apple Pay session and perform the tokenization. What differs between the two is who owns the checkout page and who triggers the order/payment.
Hosted Page
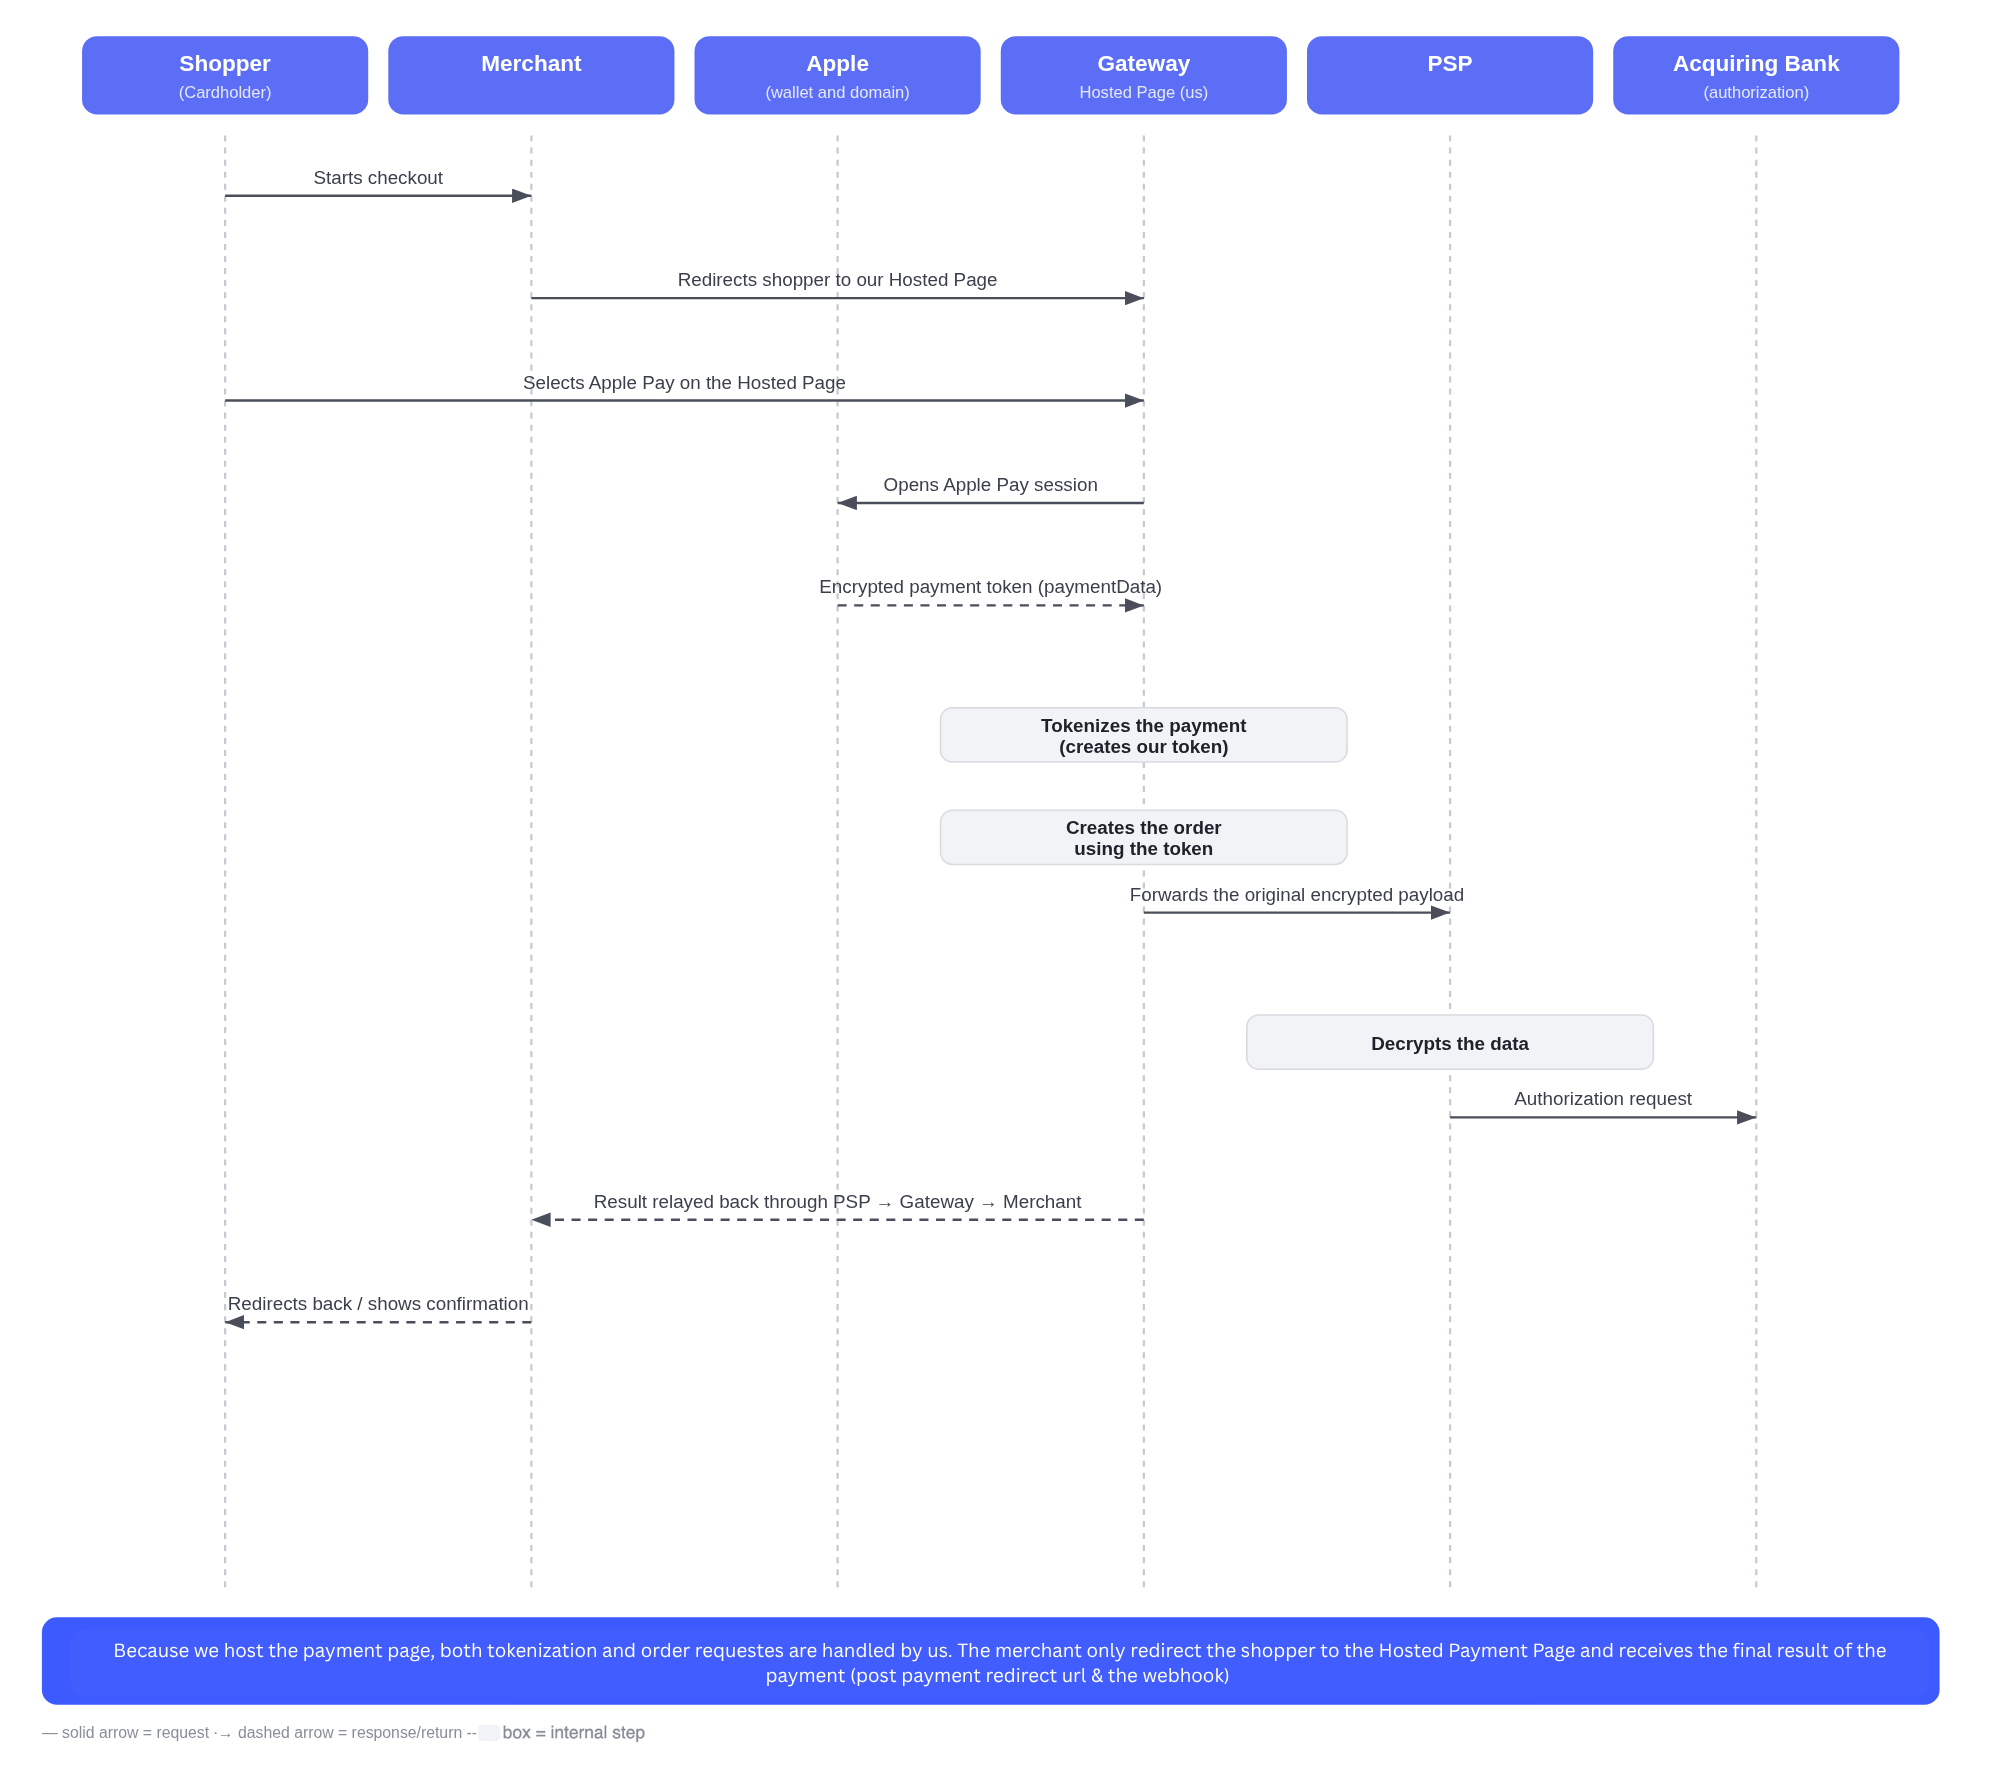
With Hosted Page, the entire checkout, including the Apple Pay button and session, is hosted by us. The merchant simply redirects the shopper to our Hosted Page and waits for the final result.
When the shopper selects Apple Pay:
- We open the Apple Pay session and receive the encrypted
paymentData. - We tokenize it internally.
- We also create the order ourselves, using that token.
- We forward the original encrypted payload to the PSP for decryption and authorization.
- The result is relayed back to the merchant via redirect or webhook.
Hosted Elements
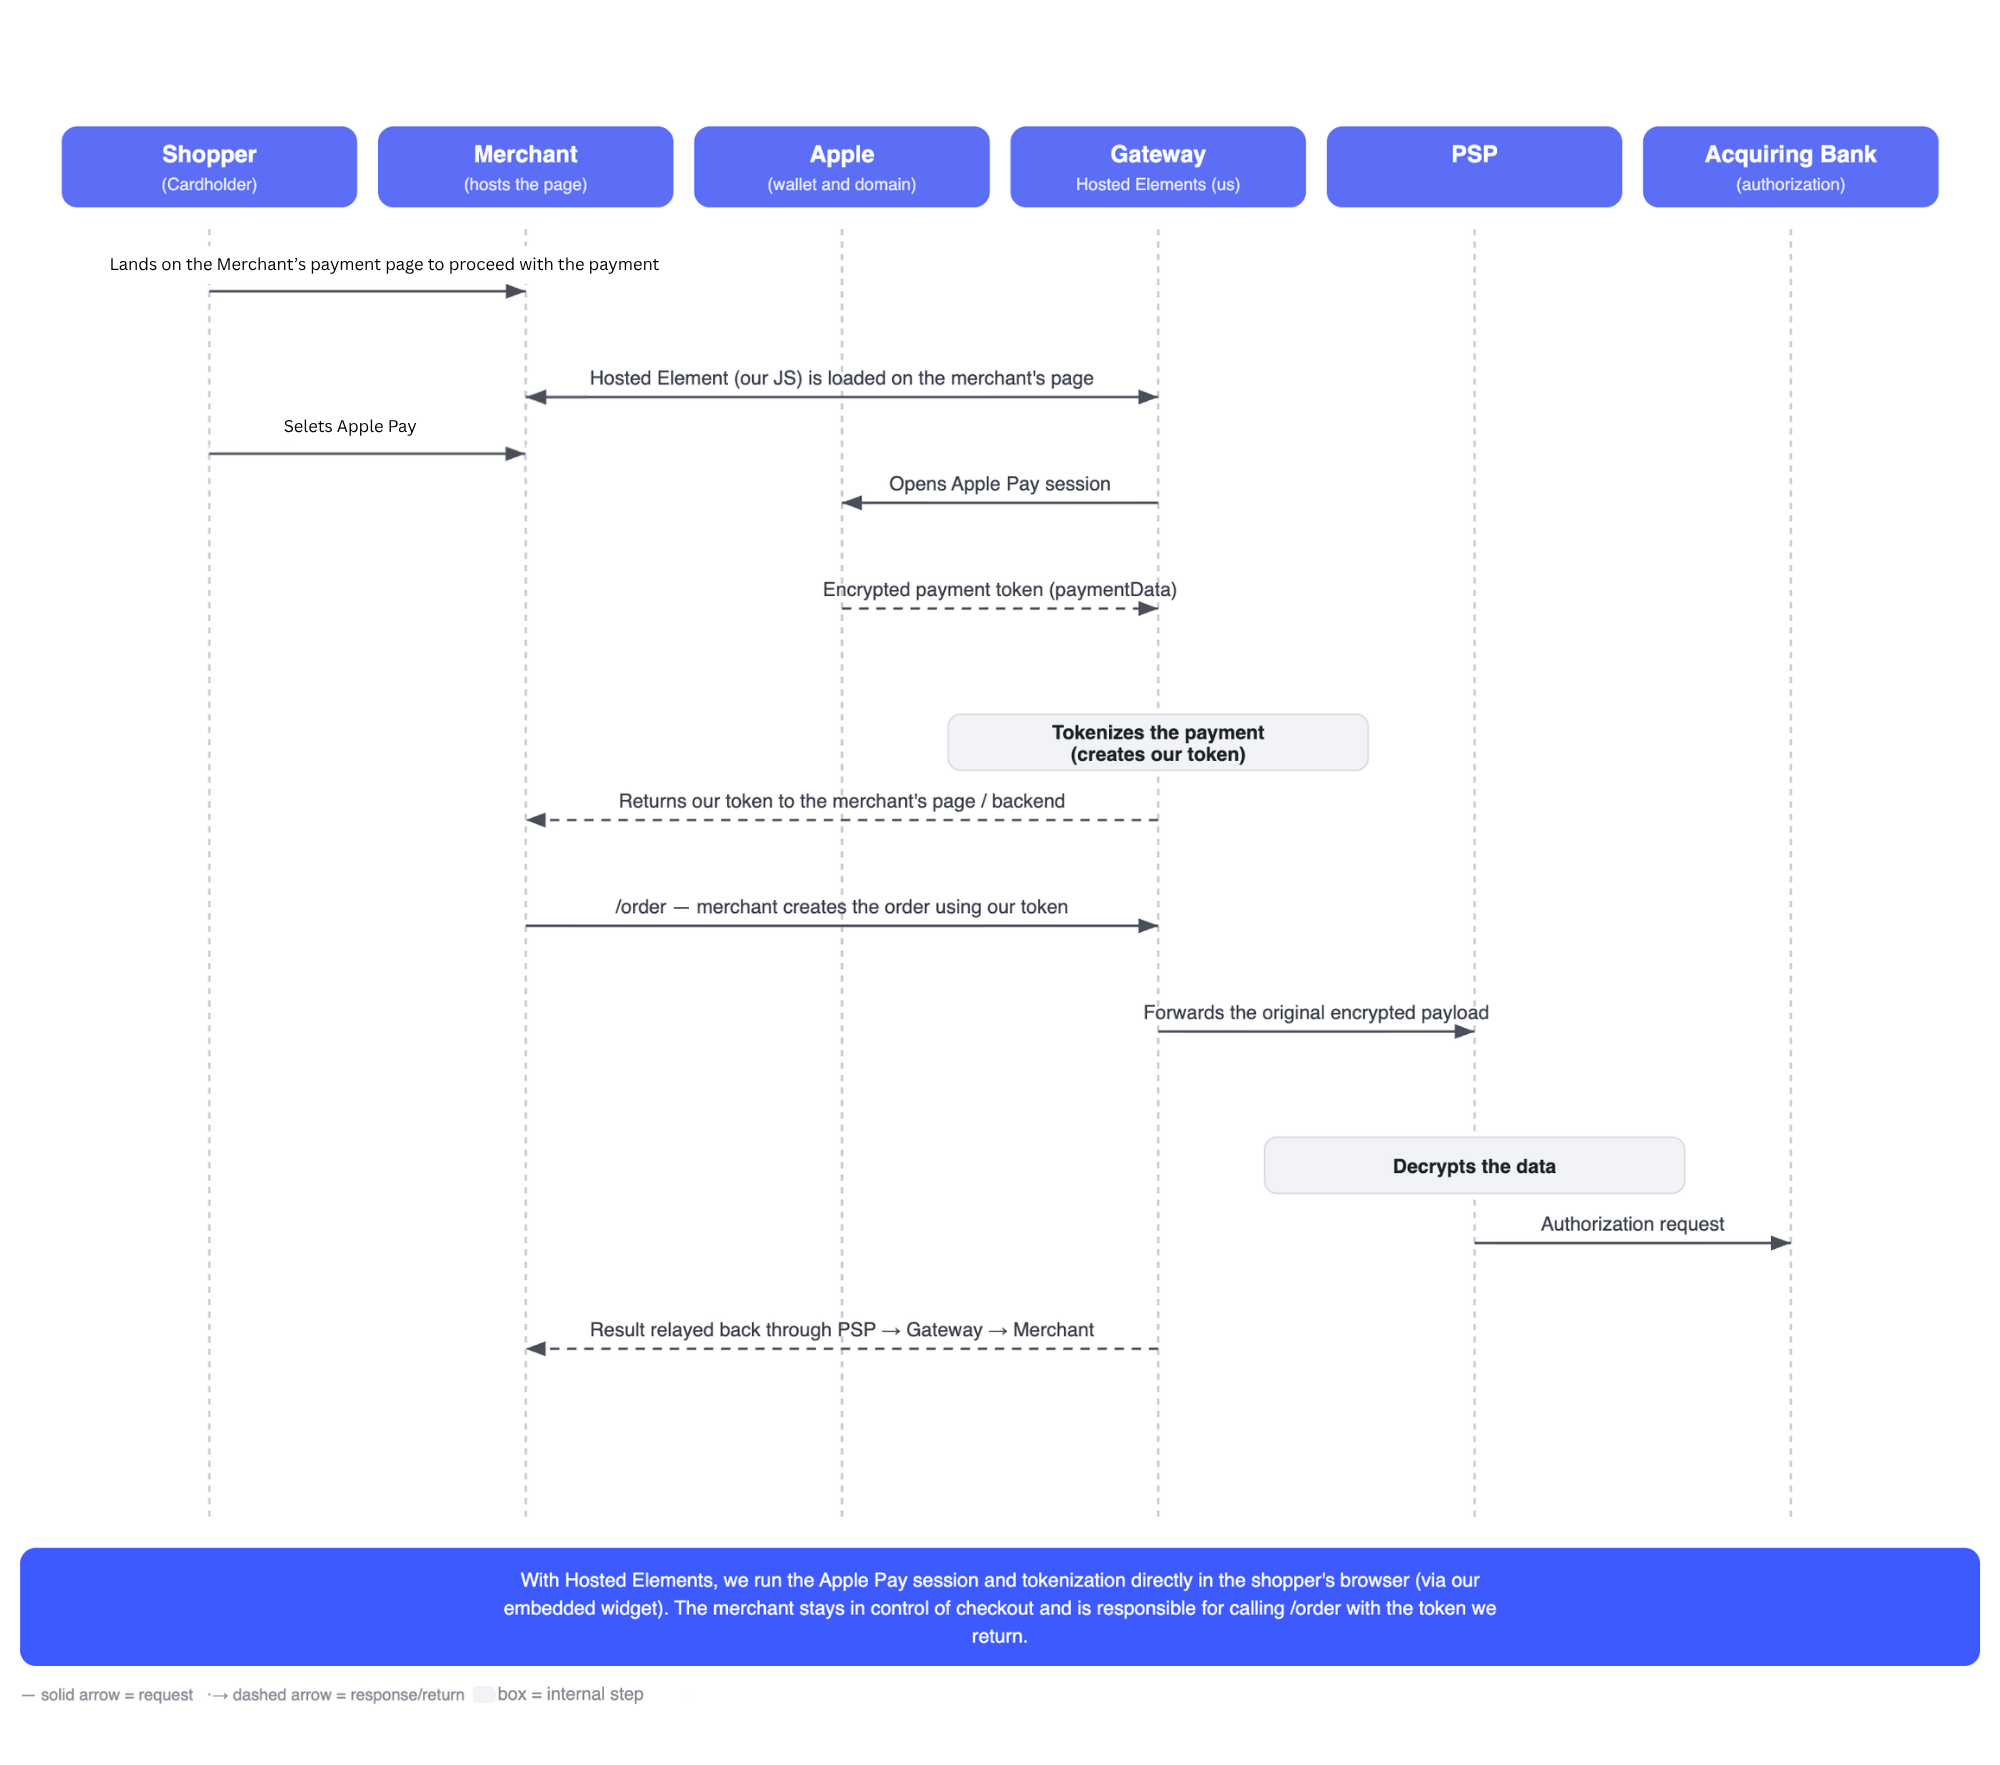
With Hosted Elements, the merchant keeps ownership of their checkout page, but embeds our Hosted Elements (a JS component) to render the Apple Pay button. We still initiate the Apple Pay session and tokenize the payload directly in the shopper's browser, via our widget, but this time:
- We open the Apple Pay session and receive the encrypted
paymentData. - We tokenize it and return our token to the merchant's page/backend.
- The merchant calls
/orderthemselves, using that token, exactly as they would with a regular card token. - From there, the flow is identical: we forward the original encrypted payload to the PSP, which decrypts it and requests authorization.
Direct API
With a Direct API integration, the merchant handles the Apple Pay session end to end on their own page: triggering Apple Pay JS themselves, receiving the encrypted paymentData, and calling our tokenization endpoint directly (see the API reference for the full request/response schema).
This gives the merchant full control over their Apple Pay implementation, at the cost of implementing more of the integration themselves.
The certificate setup described in this section applies here too: the merchant can choose Option A (own certificate) or Option B (our certificate) independently of this being a Direct API integration.
Full flow setup & runtime
- Setup (once, per certificate option - see Option A / Option B above).
- Runtime:
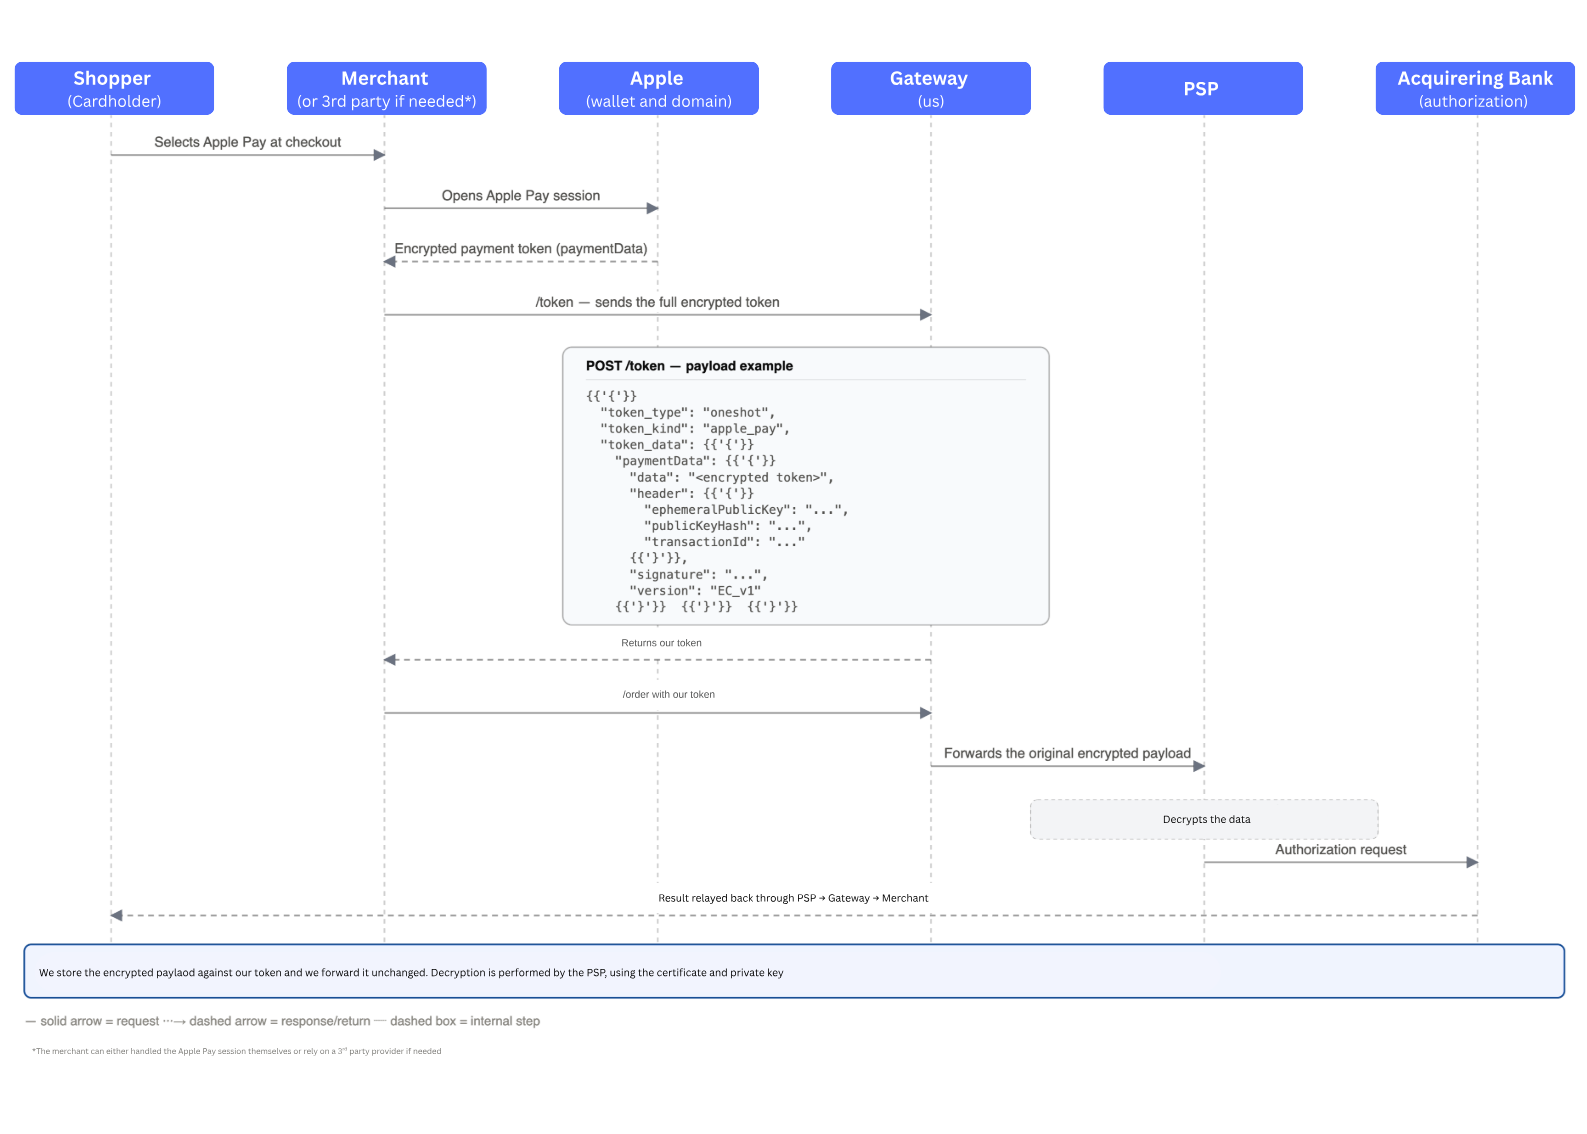
- Shopper selects Apple Pay at checkout.
- Merchant opens an Apple Pay session with Apple and receives the encrypted
paymentData. - Merchant sends the full encrypted payload to our
/tokenendpoint - see payload example below. - We store the encrypted payload against our token and return that token.
- Merchant uses our token for the subsequent
/ordercall. - We forward the original encrypted payload, unchanged, to the PSP.
- The PSP decrypts it and submits the authorization request to the acquiring bank.
- The result is relayed back through the PSP → us → the merchant.
Tokenization payload example
{

  "token_type": "oneshot",
  "token_kind": "apple_pay",
  "token_data": {
    "paymentData": {
      "data": "<encrypted token>",
      "header": {
        "ephemeralPublicKey": "...",
        "publicKeyHash": "...",
        "transactionId": "..."
      },
      "signature": "...",
      "version": "EC_v1"
    }
  }
}
For a full API reference, got to Tokenize Apple Pay section in our API reference.
Updated 2 months ago