Hosted Elements Integration
Make your first payment using Hosted Elements integration
Pre-requirements:
Before following the steps to create your first payment, make sure that:
- Your have an access to your (Sandbox) Merchant Account
- You have generated your API keys
- You have at least one merchant contract activated with at least one payment method added
Hosted Elements Setup
To use hosted elements integration, please make sure to have followed the setup guide. After it's done, you can continue following the below steps.
Test your integration
Once your integration is ready, it is crucial to perform tests in order to see if it works as expected but also to go through the customer experience.
Use your (test) website into which you have integrated our hosted elements into your payment form.
-
On your website, when you proceed to payment page, your integration creates a checkout by calling our create checkout endpoint.
During that step,
checkout_idis received in the response. Thecheckout_idshould be used in JS instance for Hosted Elements configuration. -
Your payment page will be displayed with our hosted elements populated from the SDK.
-
Fill in the payment details: card holder name, card number, card expiration date and CVV code. In case other additional field are used (eg. CIN number, ZIP code), fill them in as well.
You can use our test cards. If you need to test a specific scenario with a certain PSP, sometimes it could be useful or needed to use PSP-specific test cards.
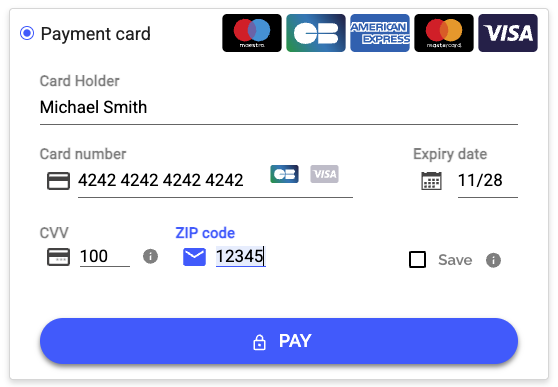
Payment page example: hosted elements
- Submit your payment by clicking the payment button.
When you submit the payment, the tokenization takes place. The
tokenis received in the response to the request we make. Your integration catches thetokento use it for the create order request. - Your integration creates the order by calling our create order endpoint including the
tokenreceived in the previous step as well as thecheckout_id. - If 3DS: For 3D Secure payments, you will be redirected to the url for performing 3DS authentication.
If the payment is initiated with 3DS specified in your create order request, you will receive the
redirect_urlin the response. Your integration should use this url to redirect the customer to. - Based on the payment result, you are redirected to the respective url (
accept_url,decline_url). If you cancelled the payment before proceeding, you will be redirected tocancel_url. These urls are handled by you.
Check your payment status
Once you have proceeded with the payment, you can check its status in your Merchant Account.
To do so, please navigate as follows:
- Log into your Merchant Account
- On the left hand-side bar in section Brainpower select Orders
- You will see all your orders for the selected period of time (set to Current month by default) with the most recent one a the top.
Updated 8 months ago