Checkout
This guide will walk you through the process of activating checkout.com on NORBr.

Step 1: Contract signature
Sign a contract with checkout.com, and get access to the back office.
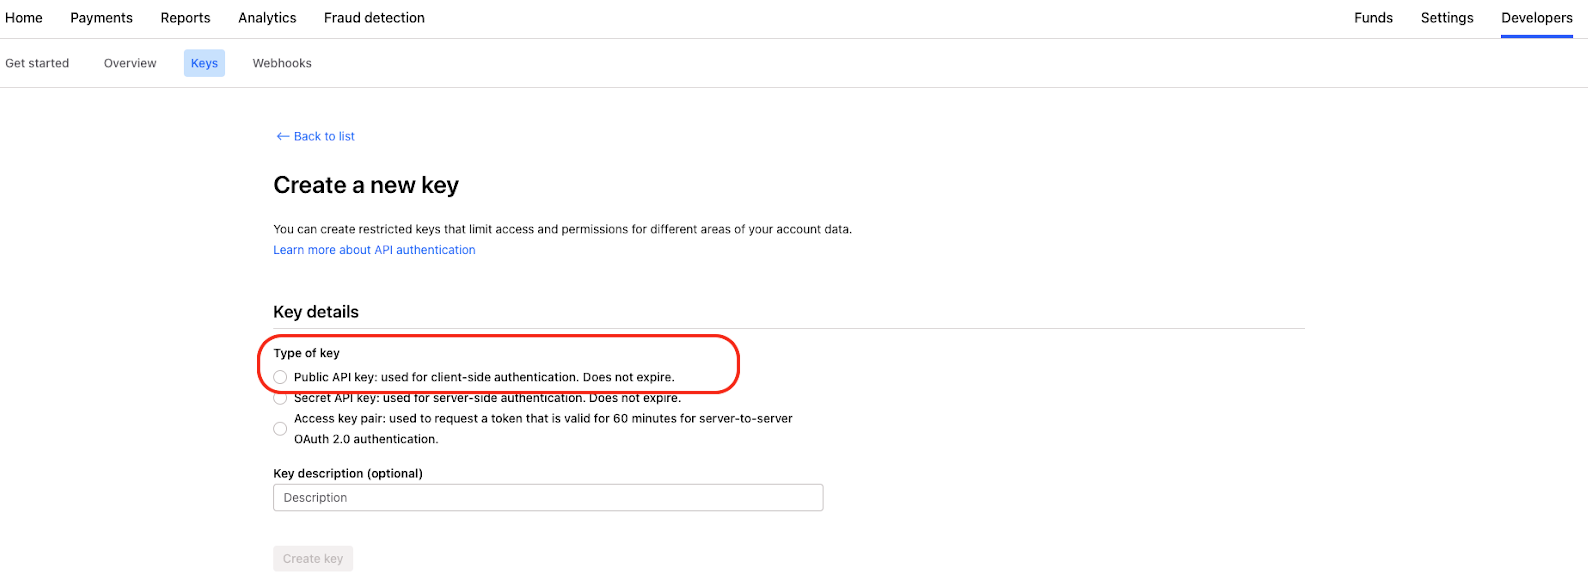
Step 2: Create your API Keys
-
Connect to the interface : https://dashboard.sandbox.checkout.com/
-
Go to Developers and → Keys or directly follow this link: https://dashboard.sandbox.checkout.com/developers/keys

-
Create a Public API Key:
a) If you have several processing channels, you can select the one you want to use and then fill out the following field in your merchant account while adding/editing the Merchant Contract.
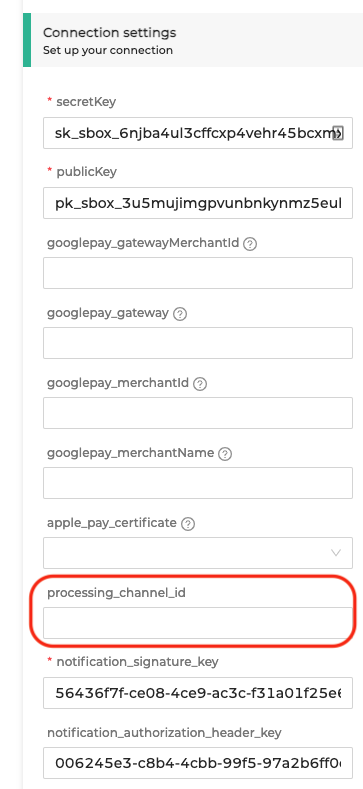
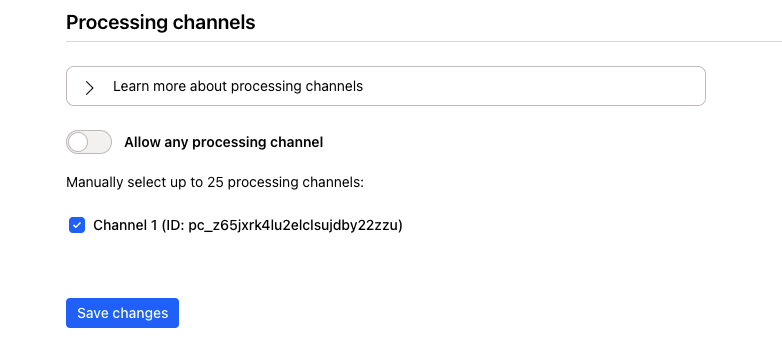
b) If you have only one processing channel: you do not have to fill the processing_channel_id as shown above out in your merchant account if you don’t select the “Allow any processing channel”, but select the channel id directly as follows:
c) If you have several processing channels, you can select a group of channels in your checkout.com account but you will have to create as many Merchant Contracts as you have channels in your merchant interface.
-
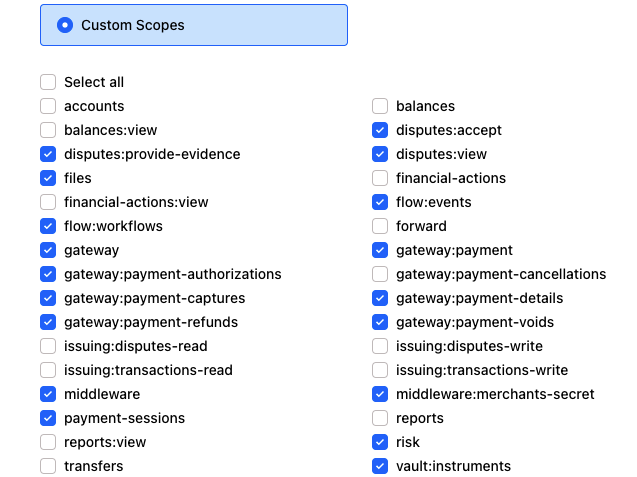
Select the following scope on your API Keys
-
Follow the same steps to create a Private API Key
Step 3: Configure the webhooks
-
Go to the webhooks tab here and add a new webhook : https://dashboard.sandbox.checkout.com/developers/webhooks

- The URL to fill out for sandbox:
https://europe-west1-webhook-reverse-proxy.cloudfunctions.net/proxy/partner/checkout
- To get the URL to fill out for production, please refer to our Support.
-
Generate an authorization header key and a signature key

-
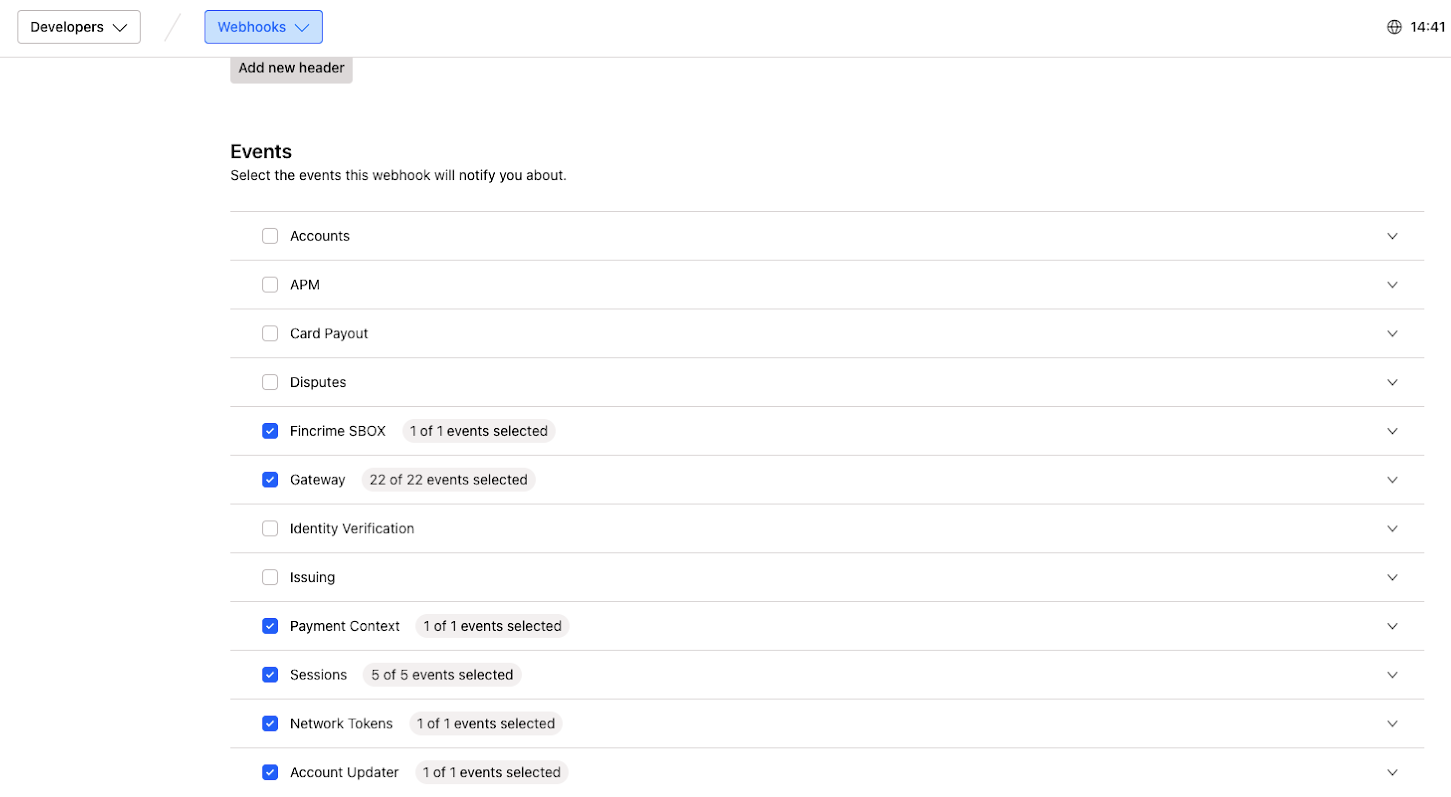
Select the following events :
-
Fincrime SBOX
-
Gateway
-
Payment Context
-
Sessions
-
Network Tokens
-
Account Updater
Step 4: Add a Merchant Contract to your Payment Network
- Log into your Merchant Account.
- Navigate to: Payment Network → Service Providers → Payment Providers → Add a Partner
- From the drop-down list, select Checkout.
- Give your contract a name for easier identification: eg. PSP name.
- Setup general setting and fill in the credentials you earlier retrieved.
- Merchant Contract ID will populate automatically.
- Settlement currency: select from the drop-down menu. You will only see the available ones.
- Select sales channel.
- Authentication and Risk Assessment: leave without changes.
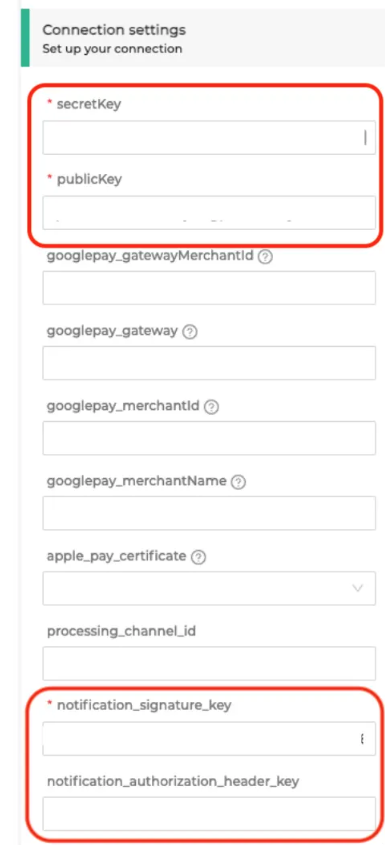
- Connection settings: fill in the credentials you retrieved.
- To activate the contract set the status to active.
Step 5: Activate payment methods
Once you set up the connection by creating the Merchant Contract, you will be able to activate payment methods available for this Partner.
In the settings of your Merchant Contract where you earlier filled in the credentials and put other settings in place, you will see a section Payment Methods with two sub-sections: Active and Available.
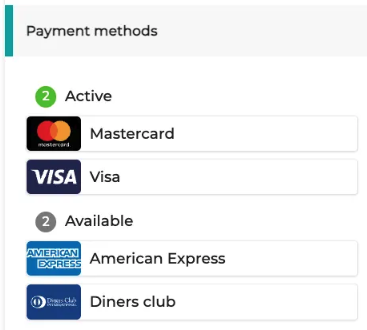
Please note that some payment methods will require additional action before you can activate them: ApplePay - ApplePay Certificate, GooglePay - your Merchant ID.
Depending on the integration type you use, there might be differences in activating ApplePay. Please reach out to get to know the steps in our use case. You will need to do one of the following:
- you will need to provide us with the Payment Processing Certificate from the Partner and we will follow up wit the setup.
- fully configure ApplePay yourself using your Apple Developer Account
Step 6: ApplePay reference for Checkout.com
Please visit ApplePay reference for Checkout here.
Step 7: Configure ApplePay fully yourself
To configure ApplePay on checkout.com, you will need an ApplePay account and a merchant ID.
Follow the steps from 1 to 5 on checkout documentation here
The next steps will need to be done in your Merchant Account as described below :
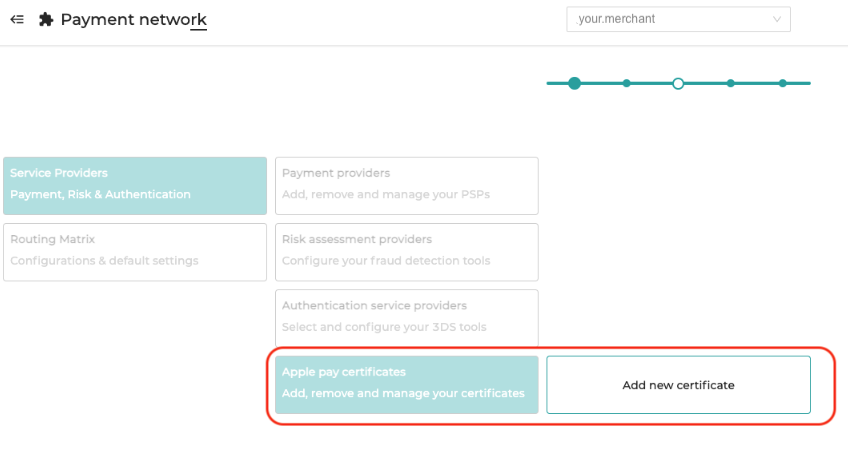
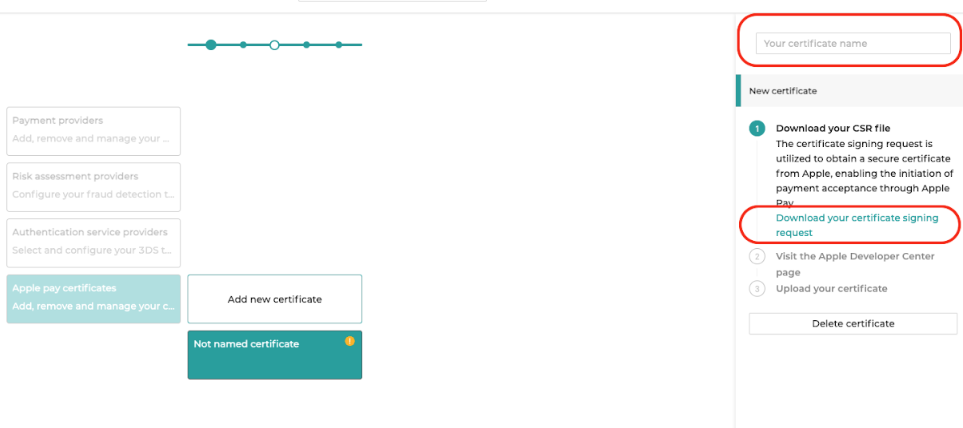
1- Create a new ApplePay certificate here:
2- Name your certificate and download the CSR file
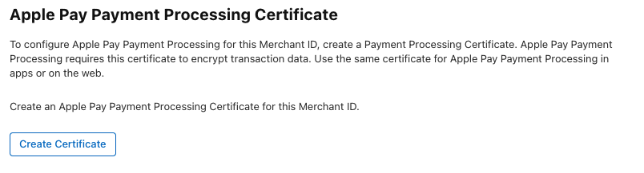
3- Sign into your ApplePay developer account, go to the Merchant IDs list here and select the merchant ID you created in step 1 of the checkout.com process
4 - In the ApplePay Merchant Identity Certificate section, select Create Certificate
5 - Upload the CSR file from step 2. above. The file should be named uploadMe.csr
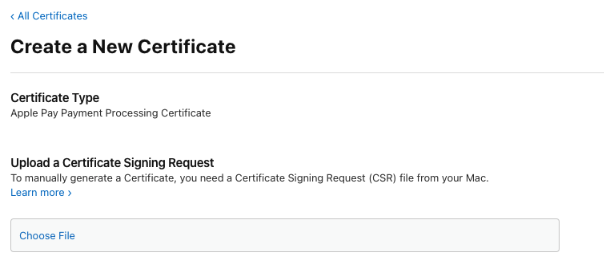
6- Select Continue and then select Download to get your CER file. It will probably be named merchant_id.cer
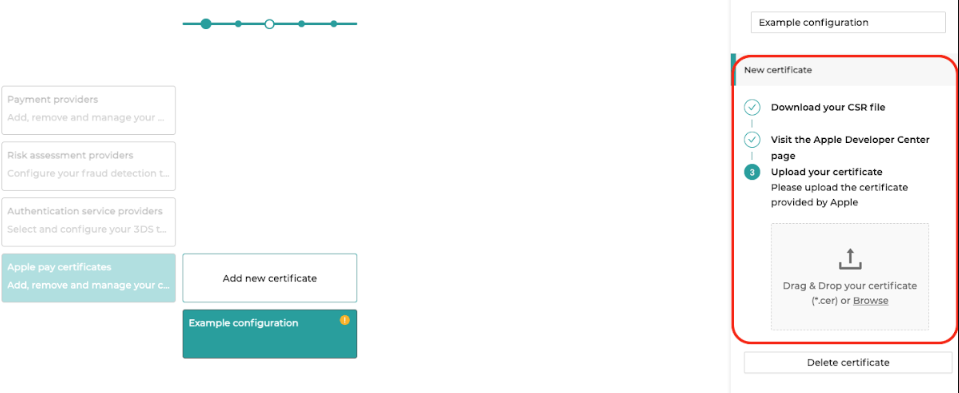
7 - Upload it to your merchant account on our side:
8 - Fill the form fields as follows:
- Expiry date : give on your ApplePay account
- Merchant Identifier : the one created in step 1
- Country code : the default country where the website operates
- Display name : the name that will appear on the ApplePay pop up on the customer’s ApplePay wallet
- InitiativeContext : the domain registered on your ApplePay Merchant ID
9- Go to your merchant contract in your merchant account and select the certificate created in the field apple_pay_certificate:
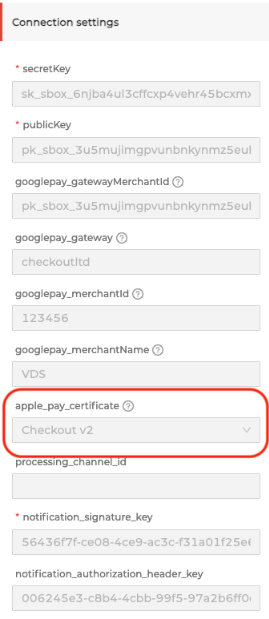
Step 5 : Configure GooglePay
1 - Onboard your website on GooglePay and get your merchant ID
2 - Fill out your credentials in your merchant contract as described below :
- googlepay_gatewayMerchantId = your checkout.com public Key
- googlepay_gateway = checkoutltd
- googlepay_merchantId = your GooglePay merchant account ID (step 1). For the sandbox environment, you can put a random string.
- googlepay_merchantName = the name display in the GooglePay pop up when the customer pays
Updated 8 months ago